Hello friends, Welcome to your channel Arte in Your Hands, today we will share
how to make this chairs with covers Mrs. Claus is a step by step very
I know that simple everyone can put into practice
then join me all the way to learn to do with me, Welcome!
For this project then felt need, the portion of the liner or sheath
We need 1 meter by 50 centimeters, fabrics that will make up our mom
claus, mrs claus, We'll use a frosty felt in
red, this piece can buy 50 cm by 50 cm, or a quarter of the fabric because
really it is not that much needed, well decorated felt or cloth Lenci
because these materials or these firebrands know them by other names
also color skin or also can yersilón use or angel skin
that fabric is also used lot in dolls and gives them a
very cute appearance to the faces of the dolls, we will use cotton
siliconized corresponding threads we need colors in fabrics
scissors, glue sticks, gun, thousands to decorate may be bias or
bies tape, braid, which You want what you want to put
in decoration, pins, these half spheres or half round buttons
they will be the eyes watching you and if you go them
draw new eyes or they buy other reasons for the eyes and these are
some materials that we will need to decorate the mrs claus
trencillas need about 30 centimeters
but then here we teach them to decorating clothing, gold buttons 3
large, these sometimes get in shops or stores where they sell everything to
dressmaking, also two beads this way, they will do earrings and
we will use macramé thread make hair Mrs. Claus
then these materials started ... and materials and
we ready then here we share them molds
Remember that found in the facebook page or blog Art
Your Hands with Lili and Sam, here on Description on the bottom
we leave the link to be much easier to find and can
download, what we do after having molds
We started cutting the pieces, parts let's cut 2 of the form
the body 2 which is the cap, I'll put the well to see them better, see them
more detailed, the neck piece are also 2 parts
the nose is only one piece Let's cut this circle one
piece, arms like 2 would then be
2 for each arm here as they can see and what the head
They are two pieces, whole body
everything that makes up the body part we're going to sew or stitch festoon
Stitch doll, except the face, which It will be the head,
this head if we will sew linear tip now I'll teach you
as I do, this itself will be on the inside to make it us
prettiest worked, then start working the body first
I will also leave a space top, now that thing them
I will teach, in some parties will leave a space for
we can fill it slightly, here and I sewed all the way around leave
space to fill whether the body parts, arms, here
It is already one filler, and is also filling
what the cap, neck clothing, face or head
this part if the part sewed linear internal stitch
we turn this piece and when and we have turned
then we can fill, finished to turn the piece and pencil
we can draw a slight smile or a smile wider as you like and
we can embroider or also use fabric markers and draw
smile, and then fill and seal what would be the head
We continue with the other pieces
as you can see here and then I introduced cotton and sewing
then to seal the piece, here and I am finishing
and then we do the same with body that we need, is the only piece
we would fail at this point finish filling
We make a knot so that it fixed us
cut, now after to finish filling all parts
We take the piece is for the nose zurcimos, we fill and we have list
Here I explain how to make the nose
darn, what I do is I make sewing intermediate line and this makes the
fabric shrinks so to speak, is darning, is prense, then that is well
He applied some cotton siliconized a very small piece
and I enter in the center and this I do is follow as squeezing fabric
I keep introducing and so we have as a button, this button cloth will
nose then what I do here is push it
but let me yarn and fabric and also to start sewing
just stay and not go to release
Coso very well on base, I can knotting and excess fabric also
then I can cut .... and so is the nose
They are already here parts lists to arm the
Mrs. Claus then here I have arms, I cut
1 piece of this frosty felt 14 centimeters by 3 centimeters
wide and what I'll do is I'm going a silicon glue hot by
contour arm remember that silicone should always
be hot to allow us stick better and also that the piece is
more fixed
are already glued, decoration here in your arms now
I'll make is that in stitch wale
I did what I would smile, now I'm going to do is stick it would be
cap or hat Mrs. Claus with hot silicone
recalls that silicone helps us first to secure the workpiece and then
silicone retouching that we will let us stay better presented
Here is the nose we can stick to once
Remember that when you paste what the nose, whether to hold and wait for it to dry
the piece, here I will hold a while to stick very well ...
and I hit the nose is completely stuck as they see no traces are
silicone because the trick is when you hit the nose hold
until it is completely dry and that allows we remain untainted fabric
and it left to the back and Now then what we do is that
Let's stick the eyes, I am here I will set eyes that looks great googly
and so then we have face Mrs. Claus
Now here we go to stick arms, I'll stick arms
I'll put some silicone at the ends where they are
arms and here I'll paste, hold until very well
glued When this happens then and there if
We stick head Mrs. Claus here already hit head
Now the application that makes the neck, I apply enough silicone to
remains well beaten and the neck dress and also allows
cover ourselves joining arms
with the same cloth would lenci make a pocket to decorate the
dressed but looking through my stuff I found these gold buttons
once he gave me an aunt and told me that someday if I needed would
be beautiful in a project and here they are, look like are beautiful
and I will stick to decorate the Mrs. Claus dress today
This gold is precious
He gave me many years ago
and Ms is Claus for the implementation of chair covers
This is the fabric that we will used as a liner or cover actually
she does not have much science because having length is 1 meter wide 50
centimeters here is bent on center
If your chair is higher then you can As lengthen the remaining 1.20 mt if
round or curved seat at the end the top can make curve
the lining to make it better dress, example in my case that I'm going to do
I will make a curve at the top and we to decorate this end millare
then I will make the process teach the final result as
in the holster actually very simple ... and then sewed fabric
by the outline I made a curved one small curve at the end we now
what I'll do is turn around, we will give full circle
To be backing us for the right
It was so
Now what we will do to we decorate it to make it more beautiful is
put a tape Here I will use a very millare
gold for silicone paste here All borte and this is what I'm going to
do you hit the silicone and then I proceed to paste the application
and it is well well liner with millare (tape) on the ends here all
the contour is very bright, very cute
Now what we will do is paste the application
Mrs. Claus we do to this project
then what we will do is that silicone paste all of
back and then glue the application the chair covers ...
well and even then with
the application chairs affixed to the covers we will finish decorating Mrs.
Claus, the thread so macramé we will do is we will cut
several pieces of 27 cm, many we will make several pieces to form
one and what we do with this part when you gather an amount
over the threads is to make a braid, this braid will be of
25 centimeters here in the middle when I started
I used to put together the center and from here to the end did a braid and center
towards the other end I the other braid, which is thus
So now what I'm going to do is put on the head
remember I always tell you to end do retouching is silicone
That's why, because for example when we put pieces such as the hair,
then this allows us to introduce
between the cap and face the braid and all around it
silicone paste now first we settled and what we do
is then hide trencilla that we do not need,
here and I hit the hair in the part of I hid behind the cap surplus,
we will being so, look how is Mrs. Claus flirtatious and
Now with pearls what I'll do is put earrings, apply silicone
and I hit where they would be ears
here's one, that is us very charming Mrs. Claus
and would, at the bottom what it does is that with the tape,
with this golden braid I'll decorate the bottom of the dress to us
further enhancement
also the silicone paste
so that it is we still prettier
and ends so that there is trencilla us here
a not so nice way in the back I apply a little
silicone
and I turn the trencilla
and at this end I like.
and as you can see He has been the chair covers with Mrs. Claus.
I hope you like this project and put it into practice
I loved it do it Remember that at the end of the video they
as is taught in photos and Mrs. Claus completely finished
I hope to put you in practice, remember that the molds
We share on the blog and on page on Facebook
Art in Your Hands with Lili and Sam, remember that We read your comments and suggestions,
give us your "I like" sign and Share the video, we see a
next project and recalls that Art Is in Your Hands

 For more infomation >> Lagda Nai Si Jass Jee Jassi X Babbu Rogla New Punjabi Sad Song 2017 YouTube - Duration: 4:01.
 For more infomation >> Brian Lozano, entre cinco Rayados, hace el 1-0 de Santos sobre Rayados - Duration: 1:23.
  For more infomation >> Preview: Face Up To Who You Really Are | Season 4 Ep. 9 | GOTHAM - Duration: 0:46.


 For more infomation >> 8 Traits of Toxic and Manipulating People - Duration: 4:42.


 For more infomation >> Eyewitness Challenge by Justin Bradford - Duration: 4:19.
  For more infomation >> How Placer County is trying to help homeless veterans - Duration: 1:54.
 For more infomation >> Human Lite. Desires are fulfilling - Duration: 1:59.
  For more infomation >> 80% without power again in Puerto Rico - Duration: 0:21.
  For more infomation >> UConn star Jalen Adams arrested - Duration: 0:56.
  For more infomation >> 컴퓨터 시스템 성능을 1,000배 향상시킨 B-2 전폭기 - ☠ 24/7 밀리터리 ☠ - Duration: 5:31.
  For more infomation >> TRƯỜNG SƠN 8 | TRƯỜNG SƠN NHẠC TUYỂN | NHẠC VÀNG THÂU THANH TRƯỚC 75 - Duration: 1:23:51.
  For more infomation >> Featuring Musician Megan Ni...
 For more infomation >> 23193555 144055626216895 4789623382469509120 n - Duration: 5:40.
  For more infomation >> HSN | Beauty Report with Amy Morrison 11.09.2017 - 07 PM - Duration: 1:00:01.
 For more infomation >> ഭാഗ്യസൂക്ത ജപം ,കോതമംഗലം വാസുദേവൻ നമ്പൂതിരി. - Duration: 1:37.
  For more infomation >> Comment perdre du ventre homme?-perdre du ventre - Duration: 5:48.
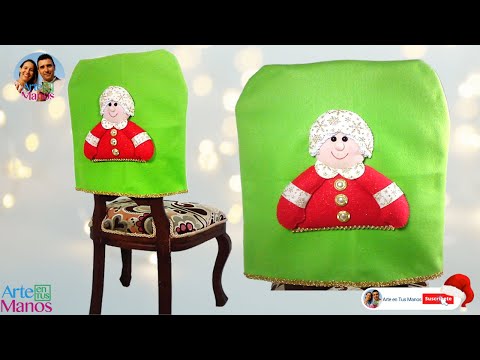


Không có nhận xét nào:
Đăng nhận xét