Thứ Hai, 9 tháng 10, 2017

Youtube daily report Oct 9 2017

Another day in World of tanks! 22!

Oh well I guess that's it. Aw man...

Let me help you out mate!

Play of the game.

Nice nice! - ****!

Time to carry this game!

No. It's okay. I still got my team mate left.

He will wihtout doubt secure this victory!

Because in world of tanks the largest part of the playerbase...

is knowledgable, inlettigent, experienced and trustwurthy!

Who am I kidding? Everyone in this game are donkeys with their brain inserted sideways up their bums.

*Den satt i plåten*

Ugh idiots...

Jag ska göra kaos med han!

Danger...

Oh look! 1 hp!

Steady

Steady...

Steady...

OP Russian heavies

WHAT?!

Holy!

Surprise!

ULTRA!

This town aint big enough for the two of us.

WHAT?!

Holy...

Hey guys it's QuickyBaby and welcome back to World of Tanks!

Support us on Patreon!

But wait a minute.

Where is T95?

But oh

Here he comes.

And he's fighting um Tiger 1! YES!

Look. That's an epic battle right there.

And tiger is very strong.

He has bombs

T95 watch out!

But T95 has an ace up his sleeve!

Tiger doens't stand a chance.

And T95 is the winner as always

And continue his journey through the universe

wow

That sure was an epic battle. Let's hope the next battle is just as epic.

Well then. Untill next time. Scrubs!

Thanks to our Patreon supporters!

Head on over to our Awesome and Epic shop! And purchase some shirts and mugs!

For more infomation >> Another Day in World of Tanks #22 - Duration: 14:08.

-------------------------------------------

Divyanka Tripathi Celebrates Karva Chauth with Her Love Vivek Dahiya !! - Duration: 3:31.

Divyanka Tripathi Celebrates Karva Chauth with Her Love Vivek Dahiya !!

For more infomation >> Divyanka Tripathi Celebrates Karva Chauth with Her Love Vivek Dahiya !! - Duration: 3:31.

-------------------------------------------

Ya Quddus Ki Fazelat | Ya Quddus ka wazifa Dushman ko meharban karne ka wazifa - Duration: 10:09.

Ya Quddus Ki Fazelat | Ya Quddus ka wazifa Dushman ko meharban karne ka wazifa

For more infomation >> Ya Quddus Ki Fazelat | Ya Quddus ka wazifa Dushman ko meharban karne ka wazifa - Duration: 10:09.

-------------------------------------------

Top 10 Horror Movies You Shouldn't Watch Alone 2017 - Duration: 7:04.

10 Horror Movies That Surpass 'It' In Creepiness

Ever entered a bet of watching a horror movie all by yourself?

Many of us have and while some failed miserably, others came out 3 hours later with a renewed

confidence to boast of!

We have all bowed down to those brave hearts, what they pulled off was no easy feat!

But what if you could rob them off their 'fearless' title?

Oh come on, you'd love to, so don't deny it!

Here's the plan, challenge them to a movie night all alone…yea, you've done it before

so what's new?

You'll be locking them up in a room to watch one of these horror flicks…far creepier

than the latest release, 'It'!

Let scary define itself!

Number 10.

The Orphanage (2007) A movie which is creepy without cheap horror

scenes is a true winner.

Your fear of kids will come alive within minutes into the film and you'll be looking for

an escape.

But the plot will grip you and remember you are already trapped, so bet seated!

Being haunted while you are on a search for your missing son might not sound just so wow

but this Spanish movie is directed so well that you won't question simplicity, EVER!

The scene where Laura, the mother plays the "One Two Three knock on the door" game

with ghostly kids is enough to stir in some fear!

Number 9.

It Follows (2014) Sex and horror don't go together; you don't

want your date to turn out as a ghost, yikes!

Imagine that actually happens to you, sex will be off limits from then on, right?

Okay that's not exactly the plot here, a girl catches a curse through sex and a shape-shifter

follows her till he can take her life.

The only way out is to have sex with someone else before he arrives.

That's quite a plot!

The thrill on the movie gradually builds, it isn't like one of those with fear pops

every now and then.

Like they say, it follows…chilling!

Number 8.

The Shining (1980) An aspiring writer moves his family into a

hotel and gets a job as the caretaker in the hope of curing his writer's block.

No issue till now?

But what if we bring in the horrific past of the hotel?

The previous winter caretaker of the hotel had killed his wife and kids before committing

a suicide, you know what we are hinting at!

Yes, he loses his sanity and puts his wife and son's life in danger.

You will shout your guts out when you see Jack turning into a toilet door-axing maniac

or when you meet the corridor twins.

The journey with the movie is eventful but you might not make it to the end, creepy!

Number 7.

Funny Games (1997) This Austrian psychological thriller can easily

put horror movies to shame with its chilling visuals!

A middle class family reach their holiday home in Austria which was probably the worst

decision of their life!

A man posing as their neighbor knocks the door and asks for some eggs, sounds perfectly

normal?

Wait till a 'funny' game of pain and death begins with this family.

You are going to be scared of vacations after you watch it till the end, we feel sorry for

you!

Oh and yes, what are you going to the next time a neighbor asks for eggs?

Yes, you shut the door right in their face!

Number 6.

The Texas Chainsaw Massacre 1974 Landing with a cannibal family on your vacation

is definitely not your plan, at least we hope so!

This American horror movie depicts a group of college students fall prey to a psychotic

cannibal family while they were exploring an old homestead.

You wouldn't want to be in that situation and more than that you wouldn't want to

witness it, it will leave you petrified!

You decide what is more terrifying to you, creepy soundtracks or the sight of a family

feasting on flesh?

The latter has been explored here, with AMAZING visuals!

Number 5.

Halloween (1978) A man escapes a mental hospital 15 years after

killing his sister on Halloween to return to his hometown…and kill again!

You know what the next day is?

Halloween!

Those costumes you so lovingly wear, will come to haunt you.

If you attempt to watch this movie, Halloween is ruined for you, that's a warning!

This low budget horror movie is gripping but more than that it stays with you, even after

it is over.

Now this alone can make you shiver, but if that has not happened already, watch this

movie…Alone!

Number 4.

The Exorcist (1973) A 12-year-old girl is possessed by the demon,

not a pretty sight OBVIOUSLY!

The movie depicts the physical and emotional breaking of the girl and trust us, it aint

easy to watch that!

When you see the girl's mother trying to get her girl back with the help of two priests,

a shiver runs down your spine.

Because exorcism aint an easy task and how else do you expect a possessed girl to be

rescued?

To creep you out even more, the movie is based on a real life incident!

Will you be able to sleep after watching this 'not-so-fiction' film?

Number 3.

The Thing (1982) Mix science fiction with horror, what do you

get?

Think people.

That's right you get 'The Thing'!

This was the movie that had the capacity to creep out Antarctic research scientists, poor

souls!

Imagine yourself as a scientist and there is a shape shifting alien parasite that can

take the form of any person it affects, did you smile?

You'd probably suspect every friend of yours and that pretty much leaves you alone, with

a parasite in your vicinity though!

We've said enough to deprive you of sleep but if that's not enough, watch the full

movie!

Number 2.

Paranormal Activity (2007) A video cam installed in the bedroom to catch

any paranormal activity, sounds more like a joke.

But what if this joke suddenly turns into the scariest reality?

We see the Goosebumps rising!

The camera actually sees a series of poltergeist activities, things that you wouldn't want

to happen to you.

Since the story looks so real, you might end up with a long lasting fear of sleeping alone

in a dark room!

The scenes of bedsheets flying, doors slamming and demon footprints on spilled powder will

stay with you for LONGER than you would want it to!

Number 1.

The Silence Of The Lambs (1991) This American thriller horror movie is very

unsettling and if you really want to test fear, this is the movie.

A girl is pulled from her training at FBI Academy to interview Hannibal Lecter, who

is a cannibalistic serial killer.

See the idea isn't very tempting if you place yourself in the girl's shoes!

But if you feel really down after watching it, do not get in touch with a therapist,

sounds weird?

Lecter was a former therapist and this information isn't easy to unlearn!

The irony is that this movie was released on Valentine's day, can you believe it?

Which of these terror tales would you watch as a challenge?

Tell us in the comment section below.

Subscribe to our channel if you liked this video.

And while you're here, check out our other videos and tell us what you think of them.

You can also find us on Twitter, Facebook and Instagram.

Thanks for watching.

For more infomation >> Top 10 Horror Movies You Shouldn't Watch Alone 2017 - Duration: 7:04.

-------------------------------------------

STAR WARS BATTLEFRONT 2 BEST GRAPHICS SETTINGS - SEE EVERYTHING - Battlefront BEST Settings - Duration: 9:26.

Hi guys FOG of GAMING here and welcome to star wars battlefront II.

Today we will take a closer look at all the graphics settings for battlefront 2 and we

will adjust them so that you can improve your experience when playing this game.

In other words we will be looking for the best settings so that you can have the advantage

over everybody else.

I will share my pc specs in the video description and I will show the main component here on

screen.

In the top left corner you will see the frames per second which you may use as a reference.

These frames are valid if you run swbf2 with an Intel Core i7-6900K and a GTX 1080 Ti in

1440p.

I am running this game borderless, dynamic resolution off, dx12 on,v sync off and I have

set the motion blur to zero.

This is how the game looks on ultra settings.

I chose this scene because it's easy to spot the differences of all the graphics settings.

There is a wall on the left which is very close to you, there are 2 statues, a tower

and you can see a tree on the right together with a detailed shadow on the ground.

Basically you can see various items and objects close by, at medium ranges and at a longer

range.

Most of the time the frame rates hovers around 100 frames per second so this makes it even

easier to compare the different settings.

The most drastic change is when you go from ultra to low right, so let's compare the

differences.

The wall on the left has lost a lot of it's detail and it looks even darker than before,

we lost the shadow of the character, the statues lost even more detail and there is even a

black line running across the leg of the furthest statue.

It seems as if the lighting in the tower has been turned off, the trees and leaves have

changed and if you look at the shadow then you can see that the leaves look like a bunch

of rectangles.

In other words, the game will look darker and less detailed, but we had a massive jump

in our frames per second, we went from 100 to 163.

Pretty impressive.

The picture will improve when you set everything to medium, but your frames per second will

drop of course.

All the way down to 124.

The wall on the left is equally dark, the black line on the statue has jumped over to

the other statue so there is definitely something weird going on over there.

The tree in the distance does look a little bit better.

The shadows are still blocky but they blind in nicer with the surrounding terrain and

the edges of objects look more refined.

Let's step it up one notch and let's set everything to high.

The wall on the left has gained some clarity again, no more dark shadows that we saw in

low and medium.

But wait a minute, are that 2 black lines on the statues now?

This is a weird anomaly and I have no explanation for this.

I presume that it's a bug and I'm sure that they will fix it in the near future.

The rest of the statue looks even better than before and somebody has turned the light back

on in the tower.

The shadow of the leaves now looks like the shadow of leaves again, no more blocky parts

and the shadow looks better overall.

As you know these settings come at a cost and the frames have dropped even further down

to 105.

When we go back to ultra then you can see that the wall on the left has gained some

of the finer details back again, the statues finally look normal and the shadow of the

tree looks amazing.

In total we only lost 5 frames compared to high.

These were drastic changes, and we will now finetune our setting so that we can modify

our game so that we can have an advantage over everybody else.

The texture quality adjusts the clarity and quality of textures game wide.

If you set the texture quality to low, then your frame rate will stay exactly the same,

to make matters worse, I can't see any noticeable difference.

I had to use photoshop to see the small changes in detail, but you won't be able to tell

when you are playing star wars battlefront II.

The same is valid when you set the texture quality to medium, high or to ultra.

Texture filtering, affects the sharpness of textures and changing this has the same effect

as changing the texture quality, in other words nothing at all.

No change in the frame rate and there is no visual change.

Changing the lighting quality does nothing at all.

No frame rate change and no visual change.

The shadow quality is a different story, on low it disables dynamic shadows, leaving only

shadows cast by fixed, static game elements.

It will give you an extra 7 frames, but the shadow of the leaves won't look like leaves

anymore.

Everything will become very blocky and you are almost able to play tetris with them.

A medium setting will still gain you 5 frames and the shadow itself will look less blocky,

less dark but it will be a lot more blurry.

A high setting will remove most the blurriness at the cost of 5 frames and ultra looks even

better, all the blurry spots are now gone while you keep the same amount of frames as

on high.

The effects quality has no impact on the frame rate or on the picture in this scene.

Post processing on the other hand can gain you 19 frames by setting it to low.

This comes at the cost of sharpness and objects will lose some details.

Medium will bring back a lot of those details but in that case you will only gain 5 frames.

High looks better of course but this time there won't be any frame rate gain, ultra

looks even better than high at the same performance level.

The mesh quality to low changes a lot and here is our black line on the statue again.

So we found the setting that was causing these issues.

This setting is also the reason why the light in the tower was turned off and the trees

look as if they lost some of their leaves.

If you payed close attention that you must have noticed that mesh quality on ultra produced

97 frames, now we have 102, so we gained 5 frames.

As you know medium brings the black line over to the other statue, this will cost you 2

frames.

On high you will get access to the guy who turns the light on in the tower and it will

show you 2 black lines on the statues.

Luckily Ultra will remove all of these issues with the black lines for you.

The only thing that the terrain quality changes is the way how some of these tiles are represented.

On low and medium you will see perfectly straight and flat tiles, on high there is some variation,

and on ultra they look very realistic with variations in height and placement.

Terrain ground cover removes the leaves on the ground, in low you won't see any leaves,

medium has a few more leaves, high even more and ultra has a lot of leaves, luckily there

is no performance impact.

Anti aliasing off makes the image lose some of it's sharpness but you will gain 4 frames.

Fxaa low gains 3 frames and looks slightly better than off.

Guess what, fxaa medium looks even better, what a surprise, but this won't gain you

any frames.

Fxaa high and TAA look incredibly similar and I can't tell which one is best, the

difference just isn't big enough to notice.

Ambient Occlusion adds contact shadows where two surfaces or objects meet.

Unfortunately, ambient occlusion has no effect what so ever in battlefront 2, so leave it

on ultra.

Motion blur will do exactly that, it will blur the surrounding area when you move for

example, by average you will get a 3 frames per second improvement with motion blur to

off, it speaks for itself that you should try to limit the amount of blur that you see.

There is one more thing that you can do, and this will drastically change your frames per

second and also the visual clarity of the game itself.

You can change the resolution scale, the effect of this is enormous.

The resolution scale will make your GPU render the image exactly at the resolution you've

set if you leave it at 100%.

If you decrease the resolution scale to 75 percent, then game will tell the GPU that

it only needs an image that's 75 percent of the original image.

The opposite is called supersampling.

The GPU now calculates more pixels, and it then scales them down to a lower resolution,

this means getting a better picture.

Lower this to 25 percent and you are going to have a very hard time with accurately shooting

at your enemies, but you are going to see 133 frames per second.

If you change this to 200% then you are going to see an enormously detailed picture but

you will only get 34 frames per second.

A more realistic setting would be 125 percent.

You will get a better image and you will still get 70 frames per second.

I did try to change the hud scale to 0% but the map is already small enough, so better

leave it at 100.

If we could change the other items separately then sure that would make sense, but we could

all benefit from a bigger map so it's best not to make it smaller.

There are 2 possible settings that we can now use depending on your pc and on your personal

playstyle.

These first settings are for a die hard, hardcore gamer who only want the highest number of

frames per second, while having a playable game without putting yourself at a disadvantage.

If you are a player like this then set the shadow quality to low for an extra 7 frames,

the post processing can gain you 19 frames by setting it to low.

Fxaa on low for 3 frames, you could set this to off, but the 2 extra frames aren't worth

it, last but not least set motion blur off for 3 frames.

These are the things that you have to change, but the following settings should be kept

to ultra, those are the texture quality, texture filtering, lighting quality, effects quality,

mesh quality, terrain quality, terrain ground cover and ambient occlusion.

If you want optimal settings, which are a mix of both, so better frames but still a

good image to look at then keep these same settings on ultra, but change the shadow quality

to medium for 5 frames, the post processing to medium for another 5 frames, select taa

and set motion blur to off.

I will recommend you to play the game once or twice with everything on ultra if your

pc can handle that, then change it to the dy hard settings and then try the optimal

settings.

Try to get an idea of what works best for you pc and for your own personal playstyle.

The die hard settings will give you an extra 32 frames per second and the optimal setting

will win you 13 frames per second.

By the way guys the Youtube likes and shares are very helpful to me.

If you think that this video is worthy, would you mind taking a moment to like this video

and to share it with all you buddies?

This was FOG of GAMING, thanks for watching and I will see you in battlefront.

Star wars battlefront 2 graphics settings.

Battlefront 2 best settings.

For more infomation >> STAR WARS BATTLEFRONT 2 BEST GRAPHICS SETTINGS - SEE EVERYTHING - Battlefront BEST Settings - Duration: 9:26.

-------------------------------------------

When Going Against The Crowd Pays Off - Duration: 0:40.

Hey this is your Coach Joaquin Palacios

bringing you a helpful post about "Motivation".

When Going Against The Crowd Pays Off.

More than ever, standing out from competitors

is a top priority for business owners.

The road to entrepreneurship is grueling,

especially when your company becomes

lost among other similar businesses.

The entrepreneurs that do get noticed

are the ones who dare to be different.

Each entrepreneur needs to find the path

that's right for them…

To read the full post, Click the link in the description…

For more infomation >> When Going Against The Crowd Pays Off - Duration: 0:40.

-------------------------------------------

[BEST EVER] | Braz VS Biinho™ | INTROS VS INTROS ! TOP 10 ! (Battle) - Duration: 2:26.

All Links and Music Names in desc !

For more infomation >> [BEST EVER] | Braz VS Biinho™ | INTROS VS INTROS ! TOP 10 ! (Battle) - Duration: 2:26.

-------------------------------------------

【ゴルフ】右脚の出しゃばりでアウトサイド・イン【ゴルフライブ】 - Duration: 2:30.

For more infomation >> 【ゴルフ】右脚の出しゃばりでアウトサイド・イン【ゴルフライブ】 - Duration: 2:30.

-------------------------------------------

TESLA | Solar tiles, powerwalls, and value for money - Duration: 6:05.

Tesla solar tiles and power walls and not new ideas.

Much like Tesla did with electric cars they've taken existing technology, enhanced it, and added sex appeal

The solar tiles and power walls are 2/3 of Elon's plan to combat climate change and save us from ourselves

Researchers believe that the ugliness and lack of convenience have been key factors in the slow take-up of solar panels

this technology has been branded as the beautiful affordable and

seamlessly integrated

And then if all those things are true. Why would you go any other direction?

With four to five million new roofs in the US alone each year and eighty to a hundred million new roofs globally

Tesla believes that within 40 years it will be strange for a house not to have this technology

This video addresses three points (1) What are Tesla Solar tiles? (2) What are the Powerwalls? and (3) Is it cost-effective?

Solar tiles come in four different styles

textured smooth

Tuscan and slate

From above the tiles are transparent

Which allows the solar cell behind the tile to charge

But from the street level the appearance of the tiles change and then look like normal tiles

This combines function with style and allows them to generate power while enhancing the look of the roof

The tiles are made with tempered glass, which sounds fragile, but tests have shown it's three times stronger than standard roofing tiles

this is why Tesla offers such a strong warranty on their tiles a warranty for the lifetime of your house or

infinity whatever comes first

They've tested these tiles by throwing 2" hailstones traveling at a hundred miles an hour on impact

These tiles have the highest possible rating against hail wind and fire

These tiles are designed to provide better insulation and can even incorporate heating elements to clear snow

So they can continue to generate power the tiles are also modular not every tile needs to have a solar cell behind it

There are calculator available online that determine what proportion of your roof should have a solar cell

While these tiles are capable of functioning as a standalone system

They are designed to work with the tesla powerwall a battery for your house

Powerwalls contained rechargeable lithium batteries and allow for the possibility of going off the grid

The original Powerwall was launched in 2015 and the Powerwall 2 was unveiled at the end of 2016

The Powerwall 2, at

13.5 kilowatt hours has a much higher capacity than the Powerwall 1

It's also quite resilient and can operating temperatures from minus 4 to

122 degrees Fahrenheit. The Powerwall also comes with an app that lets you monitor how much power is in the battery

How the power is being used in real time and how much power is being saved?

It can even be programmed to charge during off-peak periods and uses this cheaper power during the day to save you money

It has a 10 year warranty that guarantees at least 70% of the initial capacity

after 10 years

Combining the power wall with solar tiles moves us into a distributed generation model this means less reliance on large-scale

centralized power generation such as coal fire

Hydroelectric dams gas or nuclear power plants on average the transmission of power from these plants to your house

Results in a loss of 8% to 15% of power when power is consumed close to where is generated. There are efficiency gains

The cost for 70% of solar tile roof for the average US Home is $51,200

if you combine this with a power wall the total comes to $58,200 this is before any rebates or tax credits

Clearly this is a considerable investment

for the same sized house a clay tile roof would only cost 16,000 an

asphalt shingle roof would be 20,000 and a slate roof would cost 45,000 a

Typical US home spends two thousand dollars a year on electricity so 60,000 over the 30-year life time of the solar panels

This cost makes a compelling case for Tesla titles even when compared to a clay tile roof.

This is only considering the average house. If

Your house gets limited sunlight

Or you live in a tempered area and don't spend much on heating or cooling or perhaps

Utility costs are low and property taxes are high then it may not be quite so compelling

The quantifiable analysis into this consistently agrees that for almost all houses

Solar tiles and power walls are a cost-effective solution in the long run

They will save you money while providing a good-looking and durable roof

we're very confident that a solar glass roof will be less than the cost of normal roof plastic the cost of electricity so it's

This will be

economically a no-brainer

It will look we think it'll look great

And it will last it mean we thought about like having the the warranty be infinity

But then people thought well that might sound like we were just talking rubbish but

Actually the like the this is like services toughened glass like well after the house has collapsed

And there's nothing there

The roof will high-type the glass tiles will still be there.

On a personal level, I'm excited about this technology and the massive impact it could have on the environment

I hope this video added value to you Tesla and Elon Musk of fascinating to study if you want to learn more about what they're doing

Including their mission to put people on Mars can check out the links below

And if you want to support my channel you can subscribe give me a thumbs up comment share just engage with the channel

Thanks for watching

For more infomation >> TESLA | Solar tiles, powerwalls, and value for money - Duration: 6:05.

-------------------------------------------

Shell Puget Sound Refinery Fuels Education - Duration: 2:47.

For more infomation >> Shell Puget Sound Refinery Fuels Education - Duration: 2:47.

-------------------------------------------

Сказочный футаж для видеомонтажа hd лесной Эльф | Видео для детей - Duration: 0:42.

For more infomation >> Сказочный футаж для видеомонтажа hd лесной Эльф | Видео для детей - Duration: 0:42.

-------------------------------------------

【Love Live!】Zurui yo Magnetic today! [Türkçe Altyazılı] - Duration: 4:14.

For more infomation >> 【Love Live!】Zurui yo Magnetic today! [Türkçe Altyazılı] - Duration: 4:14.

-------------------------------------------

Tupac & The Notorious B.I.G'in Çözülemeyen Cinayetleri Türkçe Altyazılı Dizi Fragmanı - Duration: 1:19.

For more infomation >> Tupac & The Notorious B.I.G'in Çözülemeyen Cinayetleri Türkçe Altyazılı Dizi Fragmanı - Duration: 1:19.

-------------------------------------------

My Warm Up Routine + Beginner Tip + ANNOUNCEMENT | Violin #TutorialTime - Duration: 4:55.

Hello and welcome to my channel...

I am so happy to have you here and today I want to talk about

2 very important Warm Up Routines

When you play violin or any other instrument it is important

that your fingers are warmed up before starting to play and practice

So you avoid pain in your fingers and that they are feeling uncomfortably while playing

so like athletes or dancers are warming up

you start with some stretching excercises - this I call the STRETCH FINGER EXCERCISE

and now I show you this excercise and how it looks like

During this excercise you place your 1st finger in the first position

but you can do this excercise in any other position as well

The 1st finger remains stable - it is also important that your wrist is straight......and not bent

Now we stretch the 2nd finger as far as we can and hold the position for some seconds

and return the finger to the beginning

From the other side it looks like this

It is important - you can see it here -

when I stretch the 3rd finger - the 2nd finger remains at his position and is not moving

It can occur easily in the beginning

that your 2nd finger is also moving when stretching the 3rd finger

You can help yourself ...

*****

help yourself using the other hand for holding the finger

so it is not moving I hold the 2nd finger

and let the 3rd finger move and stretch

In the end also the 4th finger. We make sure that the 3rd finger is not moving

You can do this excercise in every position on every string

It is important that the moving finger is not pushin the string too much down

because it makes it more difficult to stretch the finger

the finger who remains, for example the 1st finger has to be stable, the 2nd finger is moving

so you will feel even in the beginning

how your fingers are being stretched and perfectly warmed up

and prepared for the actual playing

The next excercise is especially for beginners

very important to check the flexibility of the left arm when playing

For this excercise you put the violin on your shoulder

and now you tap the violin with your hand lightly and circle around the violin

then tap on the other side then going the way back around the violin

and tap again - going around - tap again

This excercise is very important: right at the beginning you can check for yourself

if you arm really is free & flexibel so that you can reach every position

that you need while playing

These were my 2 Warm Up Tips

I will soon make other videos with new tips *subscribe*

Also I wanted to announce for everyone who doesn't already know that I am currently...

...doing the #100daysofpractice challenge on Instagram...

... where you basically record yourself everyday for 1 minute practice videos

this is very great & interesting community supporting each other ... a lot of nice people....

... are participating and even for myself it is very interesting because...

... I am analyzing a lot why I practice, what & how I practice and I think....

also for you this could be interesting to follow my practice journals and read my tips

For the moment I would like to make more videos on this channel...

...in which I am going more into detail about particular excercises that I am showing on Instagram...

Just for myself to analyse my practicing and for better understanding of my habits and think even more about them

but also for you, so perhaps you find something helpful

or tips that can make your practicing more effective.

Yeah, I am excited to see you over there

and wish you a good time and good practicing ... see you very soon!!

oh ... why is my nose so itchy xD

*beautiful singing sounds* haha

ok, that sounded really weird ...

For more infomation >> My Warm Up Routine + Beginner Tip + ANNOUNCEMENT | Violin #TutorialTime - Duration: 4:55.

-------------------------------------------

Cs:Go Skin Giveaway🎉 (And Cs:Go Thumbnail Speed Edit) - Duration: 3:10.

Hey guys whats up BeAnZ here some of you guys may not know

but

I have a twitter and i am giving away a StatTrak™ Desert Eagle | Corinthian

Factory (fac) New on it (on the twitter)

For more infomation >> Cs:Go Skin Giveaway🎉 (And Cs:Go Thumbnail Speed Edit) - Duration: 3:10.

-------------------------------------------

#Костюмы спортивные5 TM Olis-Style Магазинженской одежды #Feya - Duration: 1:34.

For more infomation >> #Костюмы спортивные5 TM Olis-Style Магазинженской одежды #Feya - Duration: 1:34.

-------------------------------------------

Instagram Followers Hack - How to Get Real Instagram Followers Free - Duration: 10:33.

PLS. SUBSCRIBE & CLICK NOTIFICATION BELL

LIKE,COMMENT,SHARE SUBSCRIBE.,.

PLS. SUBSCRIBE & CLICK NOTIFICATION BELL

LIKE,COMMENT,SHARE SUBSCRIBE.,.

PLS. SUBSCRIBE & CLICK NOTIFICATION BELL

LIKE,COMMENT,SHARE SUBSCRIBE.,.

PLS. SUBSCRIBE & CLICK NOTIFICATION BELL

LIKE,COMMENT,SHARE SUBSCRIBE.,.

PLS. SUBSCRIBE & CLICK NOTIFICATION BELL

LIKE,COMMENT,SHARE SUBSCRIBE.,.

PLS. SUBSCRIBE & CLICK NOTIFICATION BELL

LIKE,COMMENT,SHARE SUBSCRIBE.,.

PLS. SUBSCRIBE & CLICK NOTIFICATION BELL

LIKE,COMMENT,SHARE SUBSCRIBE.,.

PLS. SUBSCRIBE & CLICK NOTIFICATION BELL

LIKE,COMMENT,SHARE SUBSCRIBE.,.

PLS. SUBSCRIBE & CLICK NOTIFICATION BELL

LIKE,COMMENT,SHARE SUBSCRIBE.,.

PLS. SUBSCRIBE & CLICK NOTIFICATION BELL

LIKE,COMMENT,SHARE SUBSCRIBE.,.

PLS. SUBSCRIBE & CLICK NOTIFICATION BELL

LIKE,COMMENT,SHARE SUBSCRIBE.,.

For more infomation >> Instagram Followers Hack - How to Get Real Instagram Followers Free - Duration: 10:33.

-------------------------------------------

IMT Worlds 2017 | Episode 9: Making History - Duration: 2:30.

Today we're versus Fnatic. Yesterday, we lost so today we're going to bounce back

Yo, Fnatic fan having a conversation on the bus with us.

We've uh, kidnapped Fnatic's top laner, Soaz and we've sat him in the back of the bus.

And unless Dylan Falco pays our ransom, they're not getting him back.

We talked about yesterday just communicating to each other really well and not getting cocky.

Well, we just won against Fnatic today. The game was pretty close no one really

expected the ending. Yeah we'll probably keep getting better I guess we still

have a lot of nerves, so...yup.

For more infomation >> IMT Worlds 2017 | Episode 9: Making History - Duration: 2:30.

-------------------------------------------

Mini compritas/ Little purchases Sept/Oct #1 - Duration: 7:59.

For more infomation >> Mini compritas/ Little purchases Sept/Oct #1 - Duration: 7:59.

-------------------------------------------

TJ Aparecida | Romaria da Pastoral Carcerária visita Santuário Nacional - - Duration: 3:52.

For more infomation >> TJ Aparecida | Romaria da Pastoral Carcerária visita Santuário Nacional - - Duration: 3:52.

-------------------------------------------

Vito, wer? Heidi Klum schmeißt B-Day-Sause für Tochter Lou - Duration: 1:08.

For more infomation >> Vito, wer? Heidi Klum schmeißt B-Day-Sause für Tochter Lou - Duration: 1:08.

-------------------------------------------

TESLA | Solar tiles, powerwalls, and value for money - Duration: 6:05.

Tesla solar tiles and power walls and not new ideas.

Much like Tesla did with electric cars they've taken existing technology, enhanced it, and added sex appeal

The solar tiles and power walls are 2/3 of Elon's plan to combat climate change and save us from ourselves

Researchers believe that the ugliness and lack of convenience have been key factors in the slow take-up of solar panels

this technology has been branded as the beautiful affordable and

seamlessly integrated

And then if all those things are true. Why would you go any other direction?

With four to five million new roofs in the US alone each year and eighty to a hundred million new roofs globally

Tesla believes that within 40 years it will be strange for a house not to have this technology

This video addresses three points (1) What are Tesla Solar tiles? (2) What are the Powerwalls? and (3) Is it cost-effective?

Solar tiles come in four different styles

textured smooth

Tuscan and slate

From above the tiles are transparent

Which allows the solar cell behind the tile to charge

But from the street level the appearance of the tiles change and then look like normal tiles

This combines function with style and allows them to generate power while enhancing the look of the roof

The tiles are made with tempered glass, which sounds fragile, but tests have shown it's three times stronger than standard roofing tiles

this is why Tesla offers such a strong warranty on their tiles a warranty for the lifetime of your house or

infinity whatever comes first

They've tested these tiles by throwing 2" hailstones traveling at a hundred miles an hour on impact

These tiles have the highest possible rating against hail wind and fire

These tiles are designed to provide better insulation and can even incorporate heating elements to clear snow

So they can continue to generate power the tiles are also modular not every tile needs to have a solar cell behind it

There are calculator available online that determine what proportion of your roof should have a solar cell

While these tiles are capable of functioning as a standalone system

They are designed to work with the tesla powerwall a battery for your house

Powerwalls contained rechargeable lithium batteries and allow for the possibility of going off the grid

The original Powerwall was launched in 2015 and the Powerwall 2 was unveiled at the end of 2016

The Powerwall 2, at

13.5 kilowatt hours has a much higher capacity than the Powerwall 1

It's also quite resilient and can operating temperatures from minus 4 to

122 degrees Fahrenheit. The Powerwall also comes with an app that lets you monitor how much power is in the battery

How the power is being used in real time and how much power is being saved?

It can even be programmed to charge during off-peak periods and uses this cheaper power during the day to save you money

It has a 10 year warranty that guarantees at least 70% of the initial capacity

after 10 years

Combining the power wall with solar tiles moves us into a distributed generation model this means less reliance on large-scale

centralized power generation such as coal fire

Hydroelectric dams gas or nuclear power plants on average the transmission of power from these plants to your house

Results in a loss of 8% to 15% of power when power is consumed close to where is generated. There are efficiency gains

The cost for 70% of solar tile roof for the average US Home is $51,200

if you combine this with a power wall the total comes to $58,200 this is before any rebates or tax credits

Clearly this is a considerable investment

for the same sized house a clay tile roof would only cost 16,000 an

asphalt shingle roof would be 20,000 and a slate roof would cost 45,000 a

Typical US home spends two thousand dollars a year on electricity so 60,000 over the 30-year life time of the solar panels

This cost makes a compelling case for Tesla titles even when compared to a clay tile roof.

This is only considering the average house. If

Your house gets limited sunlight

Or you live in a tempered area and don't spend much on heating or cooling or perhaps

Utility costs are low and property taxes are high then it may not be quite so compelling

The quantifiable analysis into this consistently agrees that for almost all houses

Solar tiles and power walls are a cost-effective solution in the long run

They will save you money while providing a good-looking and durable roof

we're very confident that a solar glass roof will be less than the cost of normal roof plastic the cost of electricity so it's

This will be

economically a no-brainer

It will look we think it'll look great

And it will last it mean we thought about like having the the warranty be infinity

But then people thought well that might sound like we were just talking rubbish but

Actually the like the this is like services toughened glass like well after the house has collapsed

And there's nothing there

The roof will high-type the glass tiles will still be there.

On a personal level, I'm excited about this technology and the massive impact it could have on the environment

I hope this video added value to you Tesla and Elon Musk of fascinating to study if you want to learn more about what they're doing

Including their mission to put people on Mars can check out the links below

And if you want to support my channel you can subscribe give me a thumbs up comment share just engage with the channel

Thanks for watching

For more infomation >> TESLA | Solar tiles, powerwalls, and value for money - Duration: 6:05.

-------------------------------------------

Daikin - Tutorial Instalasi VRV System (FULL HD) - Duration: 25:30.

Daikin VRV System Started To Be Marketed In Indonesia In 1982

Since 2012. Daikin VRV Sales Increased Sharply Along With The Construction Of New Buildings In Indonesia

With Increasing Installation Requests And Number Of Installers, Daikin Provides Installation Training

Video This Manual Is A Guide To Daikin VRV IV Air Conditioning System Installation

This Video Will Explain Unit Installation, Testing, And Maintenance Procedures

Make Sure To Do All The Installation Work In Accordance With The Guide

PLANNING

Installation of VRV Ac System Installation Begin With Planning To Determine Details And Classification Of Work And Making Installation Design

Designs That Have Been Made By The Consultant's Side Serves As A Guide For The Contractor During The Installation Process

This Preliminary Process Followed by Procurement and Goods Transportation

As Daikin VRV Installer, Ensure Installation Fittings As Below:

Flaring Tool

Pipe Expander

Pipe Cutter

Pipe Bender

Drill

Torque Key

R410A Manifold Gauge

Brazing Tool

Copper Pipe

PVC Pipe For Drain

Brackets And Rods

Drawing AC Project

Schematic Pipe

And Safety Equipment In The Field

TRANSPORTATION

Distance of Freight Routes Need to Be Made As Nearly Possible To Prevent Damage During Transportation To The Installation Site

Indoor And Outdoor Unit Transported To Location In Wrapped Condition

Do not Open Wrap Up Installation Time

When Receiving Products, Make Sure Indoor And Outdoor In Good Condition

And Equipped With Accessories And Manual Books That Are Inside Packaging

To Avoid Model Error Or Installation Location

Stick Paper on Packaging. Which Addresses Installation Location And System Number

Installation Procedures Indoor And Outdoor Units Can Be Different One Model With Other Models

For That, Learn To Guide In The Manual Book

Any Damage Shape on the Unit Must Be Immediately Reported

INDOOR UNIT INSTALLATION

Before the Installation Work is Upgraded, Ensure Workers Have Weared Safety Tools, Such as Gloves

Worker's Clothing

Helmet Protector

And Work Shoes

Workers Also Must Have Complete Installation Equipment

Determine Piping Direction and Air Out Direction

Mark the Central Indoor Unit with Lime on the Ceiling

From This Bottom Line, Draw a Line To Mark The Location of Indoor Captive Bolt Unit

Create Distance For The Service And Installation Room

Use Drill To Make Holes On The Marked Points

Determine the Length of an Adjusting Bolt to Height of Preferred Mount

During the Inserting Bolts In Place, Place Bolts And Washer On The Strengthening Bolt

After Installed Retaining Bolt, Adjust The Lower Bolt With Installation Height

Use Washer Plate To Strengthen Washer At The Top

Installation Height Indoor Unit Can Be Changed By Rotating Double Bolt

After Adjusting, Double Back Double Bolt

If the length of the retaining bolt exceeds 1.5 meters, place the diagonal support between the two retaining bolts

After All Of The Perfect Installation Bolts, Install Indoor Unit

In the Manual Installation, Attach the Main Retention Bracket From Unit to Bottom Retaining Bolt

After Indoor Unit Installed, Make Sure Not Italic

And Cover With Plastic Bag Or Something To Protect Units Of Dirt And Dust

MERCHANDISING INSTITUTION

The first step of pipe buffing is to determine the location and distance between buffers

Ideal Distance Interface Buffer Horizontal Refrigerant Piping Is 1-2 Meters, Depending on Diameter of Refrigerant Pipes

The Smaller the Pipe Diameter, The Distance between Buffer Should Be Shorter

While the Vertical Refrigerant Pipe Maximum Spacing is 1.5 Meters

If the Liquid and Gas Refrigerant Pipe is Hanged Simultaneously, Adjust the Buffer Size Based on the Size of the Liquid Pipe

Before Supporting Refrigerant Pipes, Install Hard Bearings For Coating Insulation Materials At Buffer Points

It Aims To Prevent Insulation Material Ripped Because Of Pipe Burden

For Horizontal Drain Pipe The distance of Idela between Buffer is 1-1,5 Meters

The length of the drain pipe should be calculated

In order for Drain Pipe to Be On Gradient Decrease Each Meter Long Pipe Down 1 Centimeter

If Multiple Pipes Are Installed In Parallel, Leave Space For Maintenance

Refrigerant Pipe Pipe And Drain Pipe Also Need To Install On Branching Pipes And Turning

On Drain Pipes Around Indoor Units And On Pipes That Pass Through Hole

REFRIGERANT PIPE WORK

Basic Principle of Refrigerant Pipe Is Pipe Should Always Be In A Clean, Dry And Not Leaking Condition

At the Time Will Store Refrigerant Pipes, Make Sure Both Pipe Ends are Closed

And Do not Put Pipe Direct On Floor

Use Desk Or Shelf To Store Pipe

Pipe Edge Protection Simply Done By Isolation

But If Pipe Will Be Left In Time More Than One Month, Pipe Edge Should Be Closed By Wash Way

Good Refrigerant Pipe Protection When Will Be Stored

Or During Work to Aim To Prevent Water, Dirt And Dust Enter In Pipe

It Can Disrupt AC Work And Cause Malfunction On The Machine

Use Insulator Material That Can Survive At Temperatures Over 70 Degrees Celsius With Minimum Thickness Of 20 Millimeters

Separate Gas and Gas Refrigerant Pipes Insulation. Do not Use Insulastors That Are Damaged Or Torn apart

To Cut a Pipe, Use a Copper Pipe Cutter

Face Pipe Down To Cut Sore Remnants No Entry Into Pipe

Rotate Little Plumbing Pipe For Little by Little

After That Puree The Sliced ​​Part With Chisel. Perform Smoothing Process Twice

To Bend Refrigerant Pipes, One Tool Used Is A Lever Type Bender

First, Mark the Pipes That Will Be At the Curve

Align the Arm Edge of the Tool With the "0" Sign In the Clamp Lever

Align Signs That Have Been Made On Pipes With "R" Or "L" Signs On Arm Tool

Arm Movement To Bend Pipe To Create The desired angle

Piped Pipe With Slow To Prevent The Formation Of Fold Or Defect On The Inside Pipe Curva

Do not Bend Pipes Over 90 Degrees

To Connect Two Refrigerant Pipes, Zoom One End of Pipe Using Pipe Expander

Put the Bigger Screw Into The Pipe And Movement The Lever Slowly

After the Two Pipes Are Connected, The Next Step Is The Welding To Unify The Pipe Connection

Flow Nitrogen Into Pipe To Prevent Forming All Oxide Films On The Inner Layer During Welding

Nitrogen Used Is Nitrogen With Purity Level At least 99.99%

Before Flowing Nitrogen, Close the Other Side Pipe Edge With Isolation In A Few Hole To Remove Nitrogen

Open the Nitrogen Gas Regulator Up to 0.02 Mpag

Make Sure the Nitrogen Pressure Is Not Too High, Because It Could Cause Metal The Laser Can Not Be Sticked Perfectly

On Pipe Connection And Causing Hollow Pipes

Before Welding, Make Sure the Pipe Has Been Connected Well

Where the mouth of the enlarged pipe can hold the connection pipe in a horizontal position without falling

Equipment Needed To Weld Consists Of:

Oxygen Tube And Regulator

Asetilene Tubes And Regulators With Sputum Prevention

Double Hose, Stretcher, and Other Lens Device

Heat the Surface of the Plumbing Pipe Connected Evenly Surround Until The Red Pipe Surface Is On

And Achieve Temperature 640-780 Degree Celsius

While Welding, Wear Protective Devices, Such as Eye and Glove Protection

In addition, Prepare the Fire Fighting War

Make a 3 Millimeter Distance From The End Of Fire By Pouring Into The Pipe With The Ignition Angle 80-85 Degrees

The Enchantment Fire End Not Can Sticking On Pipe

Melt the Metal Fillers Gradually. Then Stick On The Pipe Connector Slowly

Stainless Steel Filler With Pipe Must Overlap To Prevent Leakage

After Done, Cool the Pipe Sections Stenciled With Wet Cloth. Do not Turn Nitrogen Until It's Really Cold

For Connecting Refrigerant Pipe Branching Or Refnet With Main Pipe, Use Straight Pipe At least 0.5 Meters

Refnet Position Should be Horizontal, Not Vertical Allowed

The Distance Between a Refnet Should Be More Than 1 Meter

Use Insulators And Adhesives To In- tute Refnet

With Special Adhesives, Paste Pieces of Pieces of Pipe Isnulation Material Installed In Piping Buffer Section

Cover With Tape From Bottom Up

To Simplify Installation, Use Refnet Prepared

INDOOR TEST PRESS

After All Connected Refrigeration Components, Perform Checks With Pressure Tests.

For Leakage Can Be Easily Discovered, Launch Tests Pressed Against Pipes During Piping Installation

Pressure On Liquid And Gas Pipes With Nitrogen Flowing

Starting From 0.3 Mpag To Detect Large Leakage, Up To 4 Mpag To Detect Small Leaks

Perform Test For 3 To 5 Minutes To Detect Large Leaks

If No Pressure Down, Continue Test Up To 24 Hours To Detect Small Leak

If Pressure Drops Down, Find a Leaky Location Using Water of Soap

On Surface Connection Pipes And Replace Leaking Connections

Decrease Pressure Can In Tolerir If There Is Decreased Room Temperature, Namely 0.01 Mpag Per 1 Degree Celsius

After the Refrigerant Piping Through Leakage Test, Connect the Pipe With Indoor Unit

Apply Refrigerant Oil On Pipe Surface To Be Connected

Handwriting Hand Wound Jar, Make Sure To Use Joint Nipples Provided Together With Indoor Units

Tighten Mur Using Torque Locks, Do not Play Moles Too Tight Because Can Cause Damage On The Connection

Rotate Insulation around the Mur On the Liquid and Gas Pipes

Second Keypad of Insulation Connection With Clamping Material

DRAIN PIPE WORK

Drainage Pipe Work Begins From Piping On Side Indoor Unit

Flexible Pipe Must be Installed In Indoor Unit Before Connecting

with PVC Pipe Using Clamp Connections provided with the unit

Do Not Use Adhesives To Connect Drain Pipes With Indoor Units

Because It Will Be Difficult In Service And Maintenance

To Flow the Water Flow, Make Sure the Drain Pipe Is Installed By Tilt Comparison 1/100

The length of the Drain Pipe To The Final Disposal Place Needs To Be Shortly Predicted To Prevent Air Cavities

Do not Connect Drain Pipe With Drainage Or Waste Building Because Can Cause Not Smelly

To Combine Multiple Drain Channels, Use Y Connection

If Not Available, Use Connection T

Minimize Number of Units Combined, To Make Drain Pipe Not Too Long

Put A Cleaner Or Stoppers At The Top of The Main Channel To Test Water Flow

Perform a Water Flow Test By Entering Water Through the Plug

If No Problem And Water Can Flow Well, Install Insulator On The Cork

CONTROL OF CONTROL CORD

This Is A Power Cable And It Is A Cable Of Control. For Communication Between Indoor And Outdoor

Use Compatible Type Control Cable Protected Vinyl Gloves, Cable Thickness 0.75 Mm Up 1.25 Mm

If Control Cable Is Installed Using Grounding, Make Sure One Wire End

Connect With Grounding To Avoid Communication Techniques

Control Cable And Power Cord In Parallel

Must Be Given Distance At Least 5 Centimeters To Prevent Interference

Do Not Use Multi-Core Cables, Can Cause Signal Disturbance And Transmission Errors

In One System Use Power Cables of the Same Type

INSTALLING OUTDOOR UNIT

Try Bringing Outdoor Unit To Installation Site In Right Straight Condition To Prevent Compressor Damage

For Lifting or Outdoor Equipment Hoist to Use Sufficient Equipment

And Referring To The Manual To Prevent Unit Damage

Elevation of Base Buffer Outdoor Unit Minimum 15 Cm From Surface Floor

Install Unit into Foundation Using Nut, Bolt, Rubber Silencer, And Washer Foundation Type M12

Elevation of Mur From Maximum Foundation Surface 2 Cm

When Installing The Outdoor Unit On The Roof, Make Sure The Roof Floor Has Been Waterproof

Leave Space Between Piping With Outdoor Unit As A Service And Maintenance Room

Make Sure the Outdoor Unit Location Has Good Ventilation

To Avoid The Heat Air Out Of The Outdoor Unit

After All Work on Refrigerant Pipe Completed, Perform Vetting Process

In order for Pipe In Empty And Clean Before Press Test

At This Stage, Install Gauge On Liquid And Gas Refrigerant Port Service

Choose a Vacuum Pump That Can Make Pressure Up To -100.7 Kpag And Can Increase Volume Of Liberation

Turn on Vacuum Pumps Up to -100.7 Kpag Pressure

Turn off the Vacuum Pump And Let The Pipes In Airless Condition For 1 Hour

This Is To Ensure Gauge Indicators Not Rising.

If Indicators Up, Restore the Vote Process

TESTING AND COMMISSIONING

Here Is The Process TESTING AND COMMISSIONING

Prepare the Tools Required

Calculate Addition of Refrigerant

Measure the Length of Refrigerant Pipes To Calculate Refrigerant Quantity Required

Always Use R410A Refrigerant

Use Digital Scales

Turn on Outdoor and Indoor Power Units

Then, Open Full of Stopping Gas and Liquid Valves

Set Refrigerant Charging Into On Position

Position Tank Facing Down So Refrigerant Added In Liquid Form

If Added Refrigerant Has Achieved Wanted Weight, Press Button To Stop Operation

Include Refrigerant Addition Calculations in the "Labeling Instruction of Refrigerant Additions" installed On Outdoor Unit

This Data Will Be Required At Maintenance

Check Electricity Supply With Ampere Meter

Check Electrical Voltage With Multitester

Check Continuity Cable Outdoor Unit Kontol

Disconnect Cable From Outdoor Unit, Combine Both Kebel Tip

Then Paste the Edge with the Megger Tester Tool

To Know That Cable Is In Good Condition

Check Number of Indoor Unit On Outdoor Unit Circuit. Amount Will Appear On Digital Screen

Turn on Outdoor and Indoor Units.

Press BS2 Button On Outdoor Unit. On the Digital Screen Will Appear Code T01, Indicates Indoor Unit 1 Being Tested

If Unit 1 is Working Perfectly

Then Testing Automatically Continued to Indoor Unit 2. And So on

Testing Will Stop If There Is Problem In Communication Cable

Check the Indoor Unit being tested

And Make Repairs

Record All Test Results And Submit a Copy to the Building Manager

MAINTENANCE

To Ensure Optimal Unit Performance, Routine Serial Maintenance and Inspection Series

Prepare Necessary Equipment for Maintenance

Such as Electric Flow Meter Or Tang Ampere, Wind Speed ​​Or Anemometer Speedometer

Digital Thermometer And Pressure Detector Or Manifold Gauge

Clean Air Filter On Indoor Unit Routinely

Remove The Filter And Clean With Vacuum Cleaner Or Spray With Jet Cleaner

Vertically And Horizontally To Eliminate Dust And Dirt That Stick

Do not Use Hot Water Above 50 Degrees Celsius

Clogging Dirt Can Cause Conditions As Refrigerant Pressure Declines

Clean The Filter From The Rest Of The Water And Leave For Half Hour Until Dry

Install Back Filter

For Cleaning Outdoor Unit, Firstly Removing Condenser Fins Using Condensor Comb

This process aims to open the closed fins so that the air can flow properly

And Dirt That Stick Can Be Cleaned

After Finned Fins, Spray With Jet Cleaner Vertically And Horizontally

Install Manifold Gauge On The Port In The Outdoor Unit Perform a Refrigerant Pressure Test

Make sure the pressure of the liquid pipe is in Angaka 0.81 Mpag And Gas 2.8-3 Mpag, Depending On Environmental Temperature

Press Operation Button On PC Board To Check Cable Connection, Stop Valve, Sensor, And Refrigerant Volume

Check Electricity Supply With Tang Ampere

Check Electrical Voltage With Multitester

Ensure Air Filter, Fan, Blower, And Condenser In A Clean State

Mistakenly Adding Refrigerant Under These Conditions Can Ruin the Machine

Operate Normally With Remot Controller

Check Ac Performance After Maintenance

Record All Measures Of Maintenance And Repairs To Do And Schedule Next Maintenance

Examination And Maintenance Indoor And Outdoor Unit Routinely

Can Prevent Excess Burdens And Extend Product Period

For more infomation >> Daikin - Tutorial Instalasi VRV System (FULL HD) - Duration: 25:30.

-------------------------------------------

How To Grow Hair, Skin, And Nails "from Within" | How To Make Your Hair Grow Faster - Remedies One - Duration: 4:09.

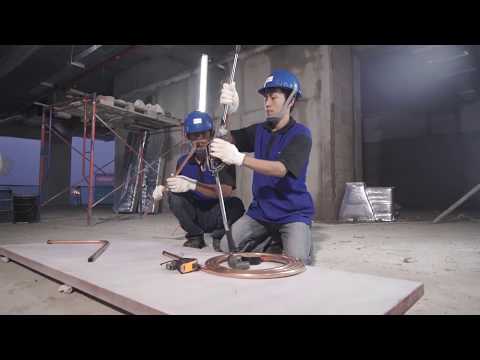
For more infomation >> How To Grow Hair, Skin, And Nails "from Within" | How To Make Your Hair Grow Faster - Remedies One - Duration: 4:09.

-------------------------------------------

How to Stop Hair Loss in Children - Making Lifestyle Modifications - Part 3 - Duration: 2:59.

How to Stop Hair Loss in Children

For more infomation >> How to Stop Hair Loss in Children - Making Lifestyle Modifications - Part 3 - Duration: 2:59.

-------------------------------------------

Featuring Musician Megan Ni...

For more infomation >> Featuring Musician Megan Ni...

-------------------------------------------

For more infomation >> Featuring Musician Megan Ni...

-------------------------------------------

Caro­line Rece­veur : le mariage ce n'est pas pour elle et elle explique pourquoi - Duration: 2:06.

For more infomation >> Caro­line Rece­veur : le mariage ce n'est pas pour elle et elle explique pourquoi - Duration: 2:06.

-------------------------------------------

For more infomation >> Caro­line Rece­veur : le mariage ce n'est pas pour elle et elle explique pourquoi - Duration: 2:06.

-------------------------------------------

Chocaate Brownie in utensil/wok without butter n chocalate -fudgy brownies-brownie recipe- - Duration: 8:26.

Hello freinds

today we r making chocalate brownie in wok/utensil on gas

Keep any stand inside, place cake tin on stand

preheat utensil like preheating oven

switch on gas n cover it

Mix together 1/4 tsp coffee n 1 tbsp water

Ingredients r

2 eggs, 32.5 g cocco powder , 70g all purpose flour,baking powder 1/2 tsp,salt 1/4 tsp,sugar 1 cup or 200 g,screwpine or vanila essence 1/6 tsp

oil 1/2 cup

Mix together all dry ingredients (salt,baking powder,flour n coccopowder)

Mix well

Mix together all wet ingredients (essence,oil,sugar,coffee ,eggs)

Blend all wet ingredients togethr

Mix together wet n dry ingredients

Mix well until no lumps in it

Fold in one direction only

Grease cake tin with oil

Add butter paper

Grease paper with oil too

Pour cake batter in greased cake tin

Tape it on floor so excess air goes out n no buibles form in brownie

Place cake tin in preheated utensil/wok

Open it with care

steam in it

Cover it

On medium flame it takes 15-20 mins to bake

on low flame it takes 30-60mins

I bake it in 15 mins on medium flame

In between keep on checking by inserting toothpick

If toothpick comes out clean or dry means brownie is ready ,if wet then bake. Little more

Aftr 10 mins opening

Wear gloves

Its risen

Toothpick is wet

Cover again

Aftr another 10 mins means total 20 mins

Opening

insert toothpick or butter knife

Toothpick is clean aftr inserting inside cake

Switch off gas n take out tin

Lets cut it,its hot

I eat it

Thnku for watching,plz sibscribe

For more infomation >> Chocaate Brownie in utensil/wok without butter n chocalate -fudgy brownies-brownie recipe- - Duration: 8:26.

-------------------------------------------

For more infomation >> Chocaate Brownie in utensil/wok without butter n chocalate -fudgy brownies-brownie recipe- - Duration: 8:26.

-------------------------------------------

Si vous souffrez d'un de ces problèmes vous devez immédiatement cesser de consommer de l'ail - Duration: 6:31.

For more infomation >> Si vous souffrez d'un de ces problèmes vous devez immédiatement cesser de consommer de l'ail - Duration: 6:31.

-------------------------------------------

For more infomation >> Si vous souffrez d'un de ces problèmes vous devez immédiatement cesser de consommer de l'ail - Duration: 6:31.

-------------------------------------------

La « fontaine de jouvence », le remède miracle qui vous fait paraître 10 ans plus jeune ! - Duration: 6:08.

For more infomation >> La « fontaine de jouvence », le remède miracle qui vous fait paraître 10 ans plus jeune ! - Duration: 6:08.

-------------------------------------------

For more infomation >> La « fontaine de jouvence », le remède miracle qui vous fait paraître 10 ans plus jeune ! - Duration: 6:08.

-------------------------------------------

Come sostituire la testina sterzo su VW LUPO TUTORIAL | AUTODOC - Duration: 3:21.

Use an open-end wrench №13 and №22

Use a socket №19

Use a special puller to take the tie rod end out

For more infomation >> Come sostituire la testina sterzo su VW LUPO TUTORIAL | AUTODOC - Duration: 3:21.

-------------------------------------------

For more infomation >> Come sostituire la testina sterzo su VW LUPO TUTORIAL | AUTODOC - Duration: 3:21.

-------------------------------------------

Model S Trunk Hatch Latch Crush Test OUCH! - Duration: 6:41.

now specifically if you have small children what I would be more worried

about instead of worrying about the pressure sensors and the trunk hatch or

the panoramic roof or even the Falcon wing doors children with small fingers

might put their finger inside the door latch itself let me show you what would

happen if you did that we're gonna use a wooden pencil that buggers in there and

yes it cranks down hard how hard see how can I get that that's not working I

can't even pull that out of there and there's no way to release it with the

door open

pencil tips still stuck in there Wow I like that pencil that is just a little

bit scary that here you can see how you know it's a standard number-two pencil

your regular everyday school pencil see what happens if I'm lower at first okay

by lowering it by lowering it then released the pencil because that men

thought the trunk was in a closed position my thought is if it knows the

trunk was then in a closed position why would it just not allow the trunk to

latch until it was already near that closed edition so if you have a child

comes over sticks their hand up up in the latch up here shoves her finger in

there that suckers gonna pinch alright now that I know it will drop the pencil

at that point now last time I tried that there's actually with a pen plastic pen

so I was able to put a little wd-40 in there and pull it through so let's try

this again all right no moorings except where it was broken

off up there so we're gonna do it down a little bit let's mark the pencil

okay mark the pencil between there as you can see there's no markings on there

I mean no dents so we're gonna put this in there that sucker clamps down

let's lower it so fixit's come on focus

and this is gonna be smaller than well it's smaller than adult finger but

something this size see that let's see if I can get to focus like there we go

focus on my hand a little better I don't have a macro lens oh I can take a

picture of it

it still doesn't want to focus yeah

I would say that is a pretty good shot for a model s trunk hatch for me

possibly even the Model X to take a child's finger off now like I said we

already know that the door you know is when it's in closed position and when

it's not so why not have the actual latch activate only after the trunk is

in a known closed position other than that now you're probably wondering well

what happens if my kid yet does get their finger stuck in there and we can't

get the door closed all the way then you will have to use the emergency release

which is up here

this is a mechanical release down this little buggers velcroing in here

and give that a nice smooth tug and that should release then it should release

what's up there Oh

crushed it more that time and there you have it back up because the car will not

release unless the trunk is near it's closed position without the manual

release be careful folks please tell your kids

not to put their fingers in machinery where they don't belong

For more infomation >> Model S Trunk Hatch Latch Crush Test OUCH! - Duration: 6:41.

-------------------------------------------

For more infomation >> Model S Trunk Hatch Latch Crush Test OUCH! - Duration: 6:41.

-------------------------------------------

Voici comment s'endormir en 30 secondes seulement ! - Santé 365 - Duration: 6:10.

For more infomation >> Voici comment s'endormir en 30 secondes seulement ! - Santé 365 - Duration: 6:10.

-------------------------------------------

For more infomation >> Voici comment s'endormir en 30 secondes seulement ! - Santé 365 - Duration: 6:10.

-------------------------------------------

Should you lose what you lov...

For more infomation >> Should you lose what you lov...

-------------------------------------------

Renault Clio !! APK T/M 9-10-2018 !! 1.6 RN - Duration: 0:54.

For more infomation >> Renault Clio !! APK T/M 9-10-2018 !! 1.6 RN - Duration: 0:54.

-------------------------------------------

[Revolution RaiderZ] - Road to LVL 50 [#2] - Duration: 8:27.

For more infomation >> [Revolution RaiderZ] - Road to LVL 50 [#2] - Duration: 8:27.

-------------------------------------------

Minecraft | Arclight Yorick Mori Abilities | DylanTheSpud's Projects - Duration: 6:16.

For more infomation >> Minecraft | Arclight Yorick Mori Abilities | DylanTheSpud's Projects - Duration: 6:16.

-------------------------------------------

Black Dragonrider motovlog 43 getting ready to cook and make chicken and salmon 😍😍 - Duration: 13:32.

For more infomation >> Black Dragonrider motovlog 43 getting ready to cook and make chicken and salmon 😍😍 - Duration: 13:32.

-------------------------------------------

Instagram Followers Hack - How to Get Real Instagram Followers Free - Duration: 10:33.

PLS. SUBSCRIBE & CLICK NOTIFICATION BELL

LIKE,COMMENT,SHARE SUBSCRIBE.,.

PLS. SUBSCRIBE & CLICK NOTIFICATION BELL

LIKE,COMMENT,SHARE SUBSCRIBE.,.

PLS. SUBSCRIBE & CLICK NOTIFICATION BELL

LIKE,COMMENT,SHARE SUBSCRIBE.,.

PLS. SUBSCRIBE & CLICK NOTIFICATION BELL

LIKE,COMMENT,SHARE SUBSCRIBE.,.

PLS. SUBSCRIBE & CLICK NOTIFICATION BELL

LIKE,COMMENT,SHARE SUBSCRIBE.,.

PLS. SUBSCRIBE & CLICK NOTIFICATION BELL

LIKE,COMMENT,SHARE SUBSCRIBE.,.

PLS. SUBSCRIBE & CLICK NOTIFICATION BELL

LIKE,COMMENT,SHARE SUBSCRIBE.,.

PLS. SUBSCRIBE & CLICK NOTIFICATION BELL

LIKE,COMMENT,SHARE SUBSCRIBE.,.

PLS. SUBSCRIBE & CLICK NOTIFICATION BELL

LIKE,COMMENT,SHARE SUBSCRIBE.,.

PLS. SUBSCRIBE & CLICK NOTIFICATION BELL

LIKE,COMMENT,SHARE SUBSCRIBE.,.

PLS. SUBSCRIBE & CLICK NOTIFICATION BELL

LIKE,COMMENT,SHARE SUBSCRIBE.,.

For more infomation >> Instagram Followers Hack - How to Get Real Instagram Followers Free - Duration: 10:33.

-------------------------------------------

[BEST EVER] | Braz VS Biinho™ | INTROS VS INTROS ! TOP 10 ! (Battle) - Duration: 2:26.

All Links and Music Names in desc !

For more infomation >> [BEST EVER] | Braz VS Biinho™ | INTROS VS INTROS ! TOP 10 ! (Battle) - Duration: 2:26.

-------------------------------------------

How to Stop Hair Loss in Children - Making Lifestyle Modifications - Part 3 - Duration: 2:59.

How to Stop Hair Loss in Children

For more infomation >> How to Stop Hair Loss in Children - Making Lifestyle Modifications - Part 3 - Duration: 2:59.

-------------------------------------------

taekwondo girl vs boy street fight 2017 by yt etertainment - Duration: 1:12.

taekwondo girl vs boy street fight 2017 by yt etertainment

taekwondo girl vs boy street fight 2017 by yt etertainment

taekwondo girl vs boy street fight 2017 by yt etertainment

taekwondo girl vs boy street fight 2017 by yt etertainment

taekwondo girl vs boy street fight 2017 by yt etertainment

taekwondo girl vs boy street fight 2017 by yt etertainment

taekwondo girl vs boy street fight 2017 by yt etertainment

taekwondo girl vs boy street fight 2017 by yt etertainment

taekwondo girl vs boy street fight 2017 by yt etertainment

taekwondo girl vs boy street fight 2017 by yt etertainment

taekwondo girl vs boy street fight 2017 by yt etertainment

taekwondo girl vs boy street fight 2017 by yt etertainment

taekwondo girl vs boy street fight 2017 by yt etertainment

taekwondo girl vs boy street fight 2017 by yt etertainment

taekwondo girl vs boy street fight 2017 by yt etertainment

taekwondo girl vs boy street fight 2017 by yt etertainment

taekwondo girl vs boy street fight 2017 by yt etertainment

taekwondo girl vs boy street fight 2017 by yt etertainment

taekwondo girl vs boy street fight 2017 by yt etertainment

taekwondo girl vs boy street fight 2017 by yt etertainment

taekwondo girl vs boy street fight 2017 by yt etertainment

taekwondo girl vs boy street fight 2017 by yt etertainment

taekwondo girl vs boy street fight 2017 by yt etertainment

taekwondo girl vs boy street fight 2017 by yt etertainment

taekwondo girl vs boy street fight 2017 by yt etertainment

taekwondo girl vs boy street fight 2017 by yt etertainment

taekwondo girl vs boy street fight 2017 by yt etertainment

taekwondo girl vs boy street fight 2017 by yt etertainment

taekwondo girl vs boy street fight 2017 by yt etertainment

taekwondo girl vs boy street fight 2017 by yt etertainment

taekwondo girl vs boy street fight 2017 by yt etertainment taekwondo girl vs boy street fight 2017 by yt entertainment commonly abbreviated as SF or スト (Suto), is a fighting video game franchise developed and published by Capcom. The second game in the series is credited with establishing many of the conventions of the one-on-one fighting genre. The game's playable characters originate from different countries around the world, taekwondo girl vs boy street fight 2017 girl vs boy kung fu fight by yt entertainment.each with a unique fighting style. It is Capcom's third best-selling franchise behind Resident Evil and Monster taekwondo girl vs boy street fight 2017 girl vs boy kung fu fight by yt entertainment.Hunter, having sold 39 million copies worldwide.[2] The first game in the series was released in 1987, since then, five other main series games, as well as various spin-offs and crossovers, have been released.taekwondo girl vs boy street fight 2017 girl vs boy kung fu fight by yt entertainment. Street Fighter, designed by Takashi Nishiyama and Hiroshi Matsumoto, made its debut in arcades, in 1987.[3][4] In this game, taekwondo girl vs boy street fight 2017 girl vs boy kung fu fight by yt entertainment.the player takes control of martial artist Ryu, who competes in a worldwide martial arts tournament, spanning five countries and 10 opponents. A second player can join in at any time and take control of Ryu's American rival, Ken.taekwondo girl vs boy street fight 2017 girl vs boy kung fu fight by yt entertainment. taekwondo street fight 2017 girl kung fu fight by yt entertainment.The player can perform three types of punch and kick attacks, each varying in speed and strength, and three special attacks: the Hadouken, Shoryuken, and Tatsumaki Senpukyaku. These are performed by executing special button combinations with the controls.[5]taekwondo girl vs boy street fight 2017 girl vs boy kung fu fight by yt entertainment. taekwondo girl street fight 2017 kung fu fight by yt entertainment.Street Fighter was ported to many popular home computer systems of the time, like the PC. In 1988, it was released on the NEC Avenue TurboGrafx-CD console under the name Fighting Street.[6] Street Fighter was also later included in Capcom Classics Collection: Remixed for the PlayStation Portable and Capcom Classics Collection Vol. 2 for the PlayStation 2 and Xbox. Street Fighter II: The World Warrior was released in 1991, and was the first true sequel to the original Street Fighter. This release followed an unsuccessful attempt to brand the 1989 beat 'em up game Final Fight and the officially commissioned spin-off Human Killing Machine as Street Fighter sequels.[7][8] It was one of the earliest arcade games for Capcom's CP System hardware Street Fighter II is the first one-on-one fighting game to give players a choice from a variety of player characters with different moves. The choice of multiple available characters allows for more varied matches. In this game, each player character had a unique fighting style with approximately 30 or more moves, including then-new grappling moves and throws, as well as two or three special attacks per character. In the single-player mode, the player's chosen character is pitted sequentially against the seven other main characters before confronting the final four boss opponents, who consist of CPU-controlled characters not selectable by the player. As in the original, a second player could join in at any point during single player mode and compete against the other player in competitive matches. Timeline of release years 1987 Street Fighter. 1988 1989 1990 1991 Street Fighter II 1992 1993 1994 1995 Street Fighter Alpha 1996 Street Fighter EX 1997 Street Fighter III 1998 1999 2000 2001 2002 2003 2004 2005 2006 2007 2008 Street Fighter IV 2009 2010 2011 2012 Street Fighter X Tekken 2013 2014 2015 2016 Street Fighter V The original Japanese version of Street Fighter II introduced an African-American boxer boss character, sharing the physical characteristics and likeness of real-life boxer Mike Tyson. In order to avoid a likeness infringement lawsuit from Tyson, Capcom rotated the names of three of the boss characters for international versions of the game.[10] The final boss, named Vega in the Japanese version, was given the M. Bison name, the talon-wielding Spanish warrior, named Balrog in the Japanese version, was renamed Vega, and the boxer became Balrog.taekwondo girl street fight 2017 girl kung fu fight by yt entertainment. Taekwondo Best Kicks Taekwondo Round kicks KO Best Knockouts Compilations 2013 taekwondo vs mma taekwondo vs karate taekwondo vs kickboxing taekwondo vs boxing taekwondo vs street fighter taekwondo vs jiu jitsu taekwondo vs muay thai the most epic knockouts (KO) Round kick tutorial Best Taekwondo kicks taekwondo olympics knockouts

Không có nhận xét nào:

Đăng nhận xét